Infill
- Infill density
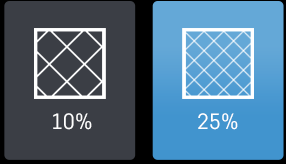
The infill density determines how dense your print will be by filling in your print with plastic by a certain percentage. 100% infill density means your print will be totally and completely filled in with plastic, while 0% infill density means your print will only print the perimeters with no plastic filling in the middle, making it hollow. More infill produces a sturdier print, but takes more time, whereas less infill produces a weaker print, and takes less time to print. An average infill density is around 20% for visual models, whereas higher infil density parts are used more for structural or mechanical use models.

- Infill pattern
Infill pattern will vary depending on what you are looking for in the use of your model. There are 7 options;
- Grid: A grid shaped infill, with lines in both diagonal directions on each layer. This option is the most common to use.
- Lines: Creates a grid shaped infill, printing in one diagonal direction per layer.
- Triangles: Creates a triangular shaped infill pattern.
- Cubic: A 3D infill of tilted cubes.
- Tetrahedral: A 3D infill of pyramid shapes.
- Concentric: The infill prints from the outside towards the center of the model. This way infill lines won’t be visible through the walls of the print.
- Zig Zag: A grid shaped infill, printing continuously in one diagonal direction.

These are a few of the infill options
- Infill layer thickness
Infill layer thickness determines how thick your infill layers are. Because you do not see the infill of a print, you can choose to make these layers less detailed and drastically reduce print time. If this setting is used, make sure the thickness is a multiple of the layer height (i.e. .1 layer height, .2 infill layer thickness). This will allow your printer to print two layers of perimeters, and then go back in and fill in the inside of the print, essentially printing the equivalent of two infill layers at a time.
- Infill before walls
If infill before walls is enabled, the layer being printed will fill in the infill before the perimeters. Printing the infill first leads to sturdier walls, but the infill pattern might sometimes show through the surface. Printing the walls first may lead to more accurate walls, but overhangs may print worse.
Comments
0 comments
Please sign in to leave a comment.