Shell
- Wall Thickness
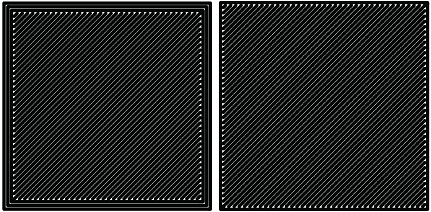
Wall thickness determines how many walls (or perimeters) your print will have. Set this value to be a multiple of line width from the section above. The larger your wall thickness, the sturdier your print will be, but the more time it will take to print. An average wall thickness is about 3 times your line width.

Left: 3 walls - Right: One wall
- Wall Line Count
You can also set a wall line count if you do not want to set your wall thickness. The wall thickness will be automatically calculated if you enter a wall line count number into this field based on your line width.
- Top/bottom thickness
The top/bottom thickness setting will determine how many solid (fully filled in) layers of plastic you will print on the top and bottom of your print. The higher the thickness count is, the less gaps you will see in the top and bottom layers, but will increase print time and use a bit more filament. When setting this value, set it as a multiple of your layer height to ensure even distribution of plastic. For thicker layer heights (.2 mm), .6 or .8 mm thickness should be sufficient. For thinner layer heights (.1 mm), use .8 or 1 mm thickness to get a clean top and bottom layer.
- Top or Bottom thickness
Here you can set different thickness for both the top and bottom of your print independently. In general, bottom thickness does not need to be set as high as the top layers because you are printing onto a flat surface. For the top layers, it is better to have more layers to fill in all voids in the print sufficiently.
- Number of Top/Bottom layers
Instead of setting the thickness of your top and bottom layers, you can adjust the specific number of layers if you wish. When you do this, the top/bottom thickness will be automatically calculated to match the layers input.
- Top/bottom pattern
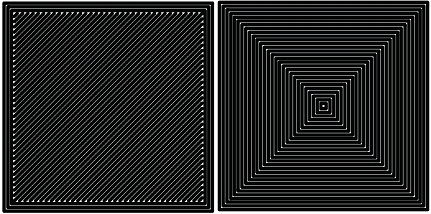
You are able to change the pattern of your top and bottom layers. There are 3 options; concentric, lines, and zig zag. Concentric fills in your layers with the same pattern from the outside in. Lines and zig zag both fill in your layers with a diagonal patern, either connecting to the shell or moving around the shell to infill the layers.

Left: lines pattern - Right: concentric pattern
- Z seam alignment
On most prints, there is a visible seam that appears on a model from when your printers’ nozzle pauses to change layers in the z direction. Z seam alignment allows you to place where each new layer in the z direction starts, effecting where the seam will be. There are 3 options to choose from; shortest, back, random.
- Shortest will use the z seam wherever the last layer left off and will start the new one right away, producing a shorter print time, but a visible seam.
- Back will simply put all layer changes at the back of the model, so make sure to rotate the model towards the back of the build plate where you dont want the seam to show up.
- Random will choose a different spot to put the seam, which will eliminate visibility, but increase print time.
Comments
0 comments
Please sign in to leave a comment.